Method 1: Using UnetBootin
UnetBootin lets you create Bootable pen drive without any hassle. Just follow these three simple steps.
CHOOSE.BROWSE.OK.
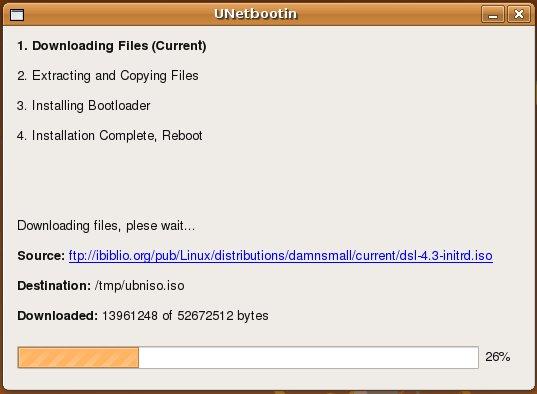
1.CHOOSE: If using Windows, run the UNETBOOTIN, select an ISO file or a distribution to download.
2.BROWSE: Browse the .iso file and select a target drive (USB Drive,say D), from the type(Refer the below picture). If your USB drive doesn't show up, reformat it as FAT32.
3.OK: Hit OK and wait for the process to end and your Bootable pen drive is ready.

==>If using Linux, make the file executable (using either the command chmod +x ./unetbootin-linux, or going to Properties->Permissions and checking "Execute"), then start the application, you will be prompted for your password to grant the application administrative rights, then the main dialog will appear, where you select a distribution and install target (USB Drive or Hard Disk), then reboot when prompted.
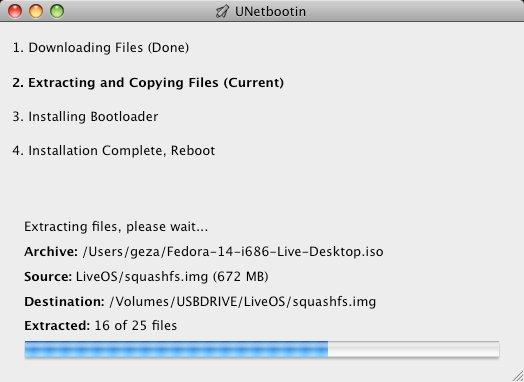
==>After rebooting, if you created a Live USB drive by selecting "USB Drive" as your install target, press the appropriate button (usually F1, F2, F12, ESC, or backspace) while your computer is starting up to get to your BIOS boot menu and select USB drive as the startup target; otherwise if there's no boot selection option, go to the BIOS setup menu and change the startup order to boot USB by default. Note that Live USB drives are bootable only on PCs (not on Macs). Otherwise, if you did a "frugal install" by selecting "Hard Disk" as your install target, select the UNetbootin entry from the Windows Boot Menu as the system boots up.
==>If using Linux, make the file executable (using either the command chmod +x ./unetbootin-linux, or going to Properties->Permissions and checking "Execute"), then start the application, you will be prompted for your password to grant the application administrative rights, then the main dialog will appear, where you select a distribution and install target (USB Drive or Hard Disk), then reboot when prompted.
==>After rebooting, if you created a Live USB drive by selecting "USB Drive" as your install target, press the appropriate button (usually F1, F2, F12, ESC, or backspace) while your computer is starting up to get to your BIOS boot menu and select USB drive as the startup target; otherwise if there's no boot selection option, go to the BIOS setup menu and change the startup order to boot USB by default. Note that Live USB drives are bootable only on PCs (not on Macs). Otherwise, if you did a "frugal install" by selecting "Hard Disk" as your install target, select the UNetbootin entry from the Windows Boot Menu as the system boots up.
It is yet another utility that lets you create bootable pendrive without breaking a sweat. Just follow the instructions in the following video(Video compiled by mullinsJ08) and you'll be able to do it yourself.
In the above video you can also use Deamon Tools to mount the .iso file and then use it as a CD Drive instead of extracting the .iso file.
In the above video you can also use Deamon Tools to mount the .iso file and then use it as a CD Drive instead of extracting the .iso file.
Method 3: Using WinToBootic
Though the above two utilities are better than this one, but just for knowledge purpose that another tool exists, I am mentioning it. Nothing much to tell here, just choose the .iso file and hit ok and you are good to go.

Method 4: Using Hp utilities
Try these 2 USB Flash Drive Utilities by HP/Compaq. They work with Most other brands of flash drives as well.
hpflash2.zip HP USB Disk Storage Format Tool. Formerly called hpflash1.zip
HP Drive Key Boot Utility Version 7.41
Download
For the downloads section I use nLite to make and create the image file as you can import the service packs and do some tweaking to the install files.
http://www.nliteos.com/download.html
1. Install the HP USB Disk Storage Format Tool and run the program.
2. Select the Device and the File system from the drop down menus and click start.
3. Close the above program and install and run the HP Drive Key Boot Utility. Selecting the appropriate drive letter. Click Next.
4.Select the circle on the top that says create New or Replace Existing Configuration. Click Next.
5. Select the circle labeled Hard Drive. Click Next.
6. Select Create New Filesystem. Click Next.
7. Select the circle labeled HP Firmware Flash Package. Click Next.
Click Finish
Method 5: Using the inbuilt utility in Windows vista/7:
Just follow these simple steps:
1. Plug in your USB Flash Drive
2. Open a command prompt as administrator (Right click on Start > All Programs > Accessories > Command Prompt and select “Run as administrator”
3. Find the drive number of your USB Drive by typing the following into the Command Prompt window:
diskpart
list disk
The number of your USB drive will listed. You’ll need this for the next step. I’ll assume that the USB flash drive is disk 1.
4. Format the drive by typing the next instructions into the same window. Replace the number “1” with the number of your disk below.
select disk 1
clean
create partition primary
select partition 1
active
format fs=NTFS
assign
exit
When that is done you’ll have a formatted USB flash drive ready to be made Bootable. And yes, you can just format it by right clicking and choosing the format option :D
Step 2: Make the Drive Bootable
Next we’ll use the bootsect utility that comes on the Vista or Windows 7 disk to make the flash drive bootable. In the same command window that you were using in Step 1:
1. Insert your Windows Vista / 7 DVD into your drive.
2. Change directory to the DVD’s boot directory where bootsect lives:
d:
cd d:\boot
3. Use bootsect to set the USB as a bootable NTFS drive prepared for a Vista/7 image. I’m assuming that your USB flash drive has been labeled disk G:\ by the computer:
bootsect /nt60 g:
4. You can now close the command prompt window, we’re done here.
Step 3: Copy the installation DVD to the USB drive
The easiest way is to use Windows explorer to copy all of the files on your DVD on to the formatted flash drive. After you’ve copied all of the files the disk you are ready to go.
Step 4: Set your BIOS to boot from USB
This is where you’re on your own since every computer is different. Most BIOS’s allow you to hit a key at boot and select a boot option.
That was all on HOW TO CREATE YOUR VERY OWN BOOTABLE PENDRIVE. For queries, your views, use the comment form below and don't forget to subscribe and like :D PEACE.